Installation from LiveCD is a breeze. In the newer versions of Ubuntu/Kubuntu (other distros are likely to have similar arrangement), there is an installation icon on the desktop. Just click it and off you go. Otherwise, the option to install would come up while booting with the CD inside.
One of the place where you might get caught up is the
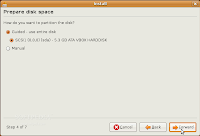
partition section. If you are installing it fresh onto a hard disk, there is nothing to worry. Just select the hard disk and everything will be done automatically. Select the
manual option if you have to do other things like dual-boot or install the OS only onto a part of hard disk. If you are planning to dual boot, better free around 6GB or more disk space and partition it into a separate drive using
Partition Magic or some other in Windows itself. I always have half of my 14 GB IDE hard disk (yes they did exist 10 years ago!) free for this purpose. XP goes into the other half.
Back to partitioning, after selecting manual option, you'll get to a window showing the p
artitioned drives. If you do not see any of the drives not listed, that's probably because you might have mounted some drive before starting installer. Better exit the installer,
unmount all drives (right click and select unmount) and start all over again[1]. Once you reach the partition manager section and see that all drives are listed, you can start the partitioning. Delete the partition you intend to install OS onto. Various sugge
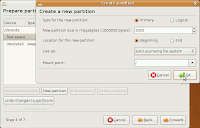
stions have been made about partitioning the drive. The most consistent one is to have a /home partition (1.5GB+), / partition (4GB+) and swap space (the size of your RAM is recommended). So once you have decided how to do the partitioning, go on to the next steps and finish installation. If everything has gone well, you'll see the grub menu after rebooting.
Troubleshooting:
1. Getting stuck before LiveCD even boots properly.
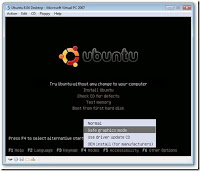
Soln: the problem is likely with the graphics card not being properly supported by default.
Select the
safe graphics mode in modes (F4) when the booting from CD menu comes up.
2. Grub not loading after installation.
Soln: This could happen in systems having two or more physical hard disks. The problem is that grub could be matching the hard disks in the wrong way. The workaround I found is to change the Hard Disk priority in BIOS. In my BIOS menu, I just changed the Hard disk order under boot menu and it worked. (went through a lot of trouble trying to find solution for this one..)
[1]: For those who found what I said confusing. This happens only when you are installing after trying out OS directly from LiveCD. If you try to access files on your computer while doing so, those drives would be
mounted. The partition manager requires all the drives to be
unmounted before partitioning work is done. Hence if you plan to install the OS onto your system, either do not access files that time or unmount all drives.


 Click to enlarge
 artitioned drives. If you do not see any of the drives not listed, that's probably because you might have mounted some drive before starting installer. Better exit the installer, unmount all drives (right click and select unmount) and start all over again[1]. Once you reach the partition manager section and see that all drives are listed, you can start the partitioning. Delete the partition you intend to install OS onto. Various sugge
 stions have been made about partitioning the drive. The most consistent one is to have a /home partition (1.5GB+), / partition (4GB+) and swap space (the size of your RAM is recommended). So once you have decided how to do the partitioning, go on to the next steps and finish installation. If everything has gone well, you'll see the grub menu after rebooting.